Prepare & program the pick, place the machine with all the components and their location on the Hardsploit PCB board, set up all the parameters… That’s a lot of things to plan ! We begin with the solder past dispensing…

Author: hardsploit.io
Time to present our electronics lab
Welcome inside our own private Hackerspace ! Our (modest but efficient) industrial lab is composed of : Dedicated machines room 1 pick & Place machine (Mechatronika M10) You can find more info on its features on http://www.mechatronika.com.pl/content/view/21/4/lang/en/ 1…
PCB Board for Prototype just arrived
Thanks to PCB Beta Layout, we received the stencil very quickly And of course the PCB Go to Pick and place Machine to create the First Hardsploit prototype 😉 Exciting !
Autorouting rocks !
After the placement of main components on the board, the Eagle automatic router module get the job done ! It was very efficient to find around 90 % of all routes that are necessary to connect all our component … automatically.…
Hardsploit PCB Routing in progress
You like wires ? Routing mor than 64 leds, one TQFP FGPA integrated circuit and one microcontroller (STM) on a double face PCB is a challenging task ! Trust us ! Not surprising that finding a way to create all…
Electronic Schematic designed done !
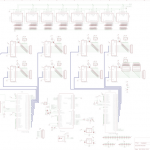
We have finished the electronic schema. Main issue was to find the best and cost effective central component suitable for our goal (The FPGA component). We choose a Cyclone II from Altera. The use of 64 leds was also an…
Top